New Year Wallpaper Design with CorelDraw
Lets spice up your New Year with creating your own New Year wallpaper. In this tutorial you will learn how to design a colorful New Year wallpaper with 3D Text effects and fireworks effects in CorelDraw.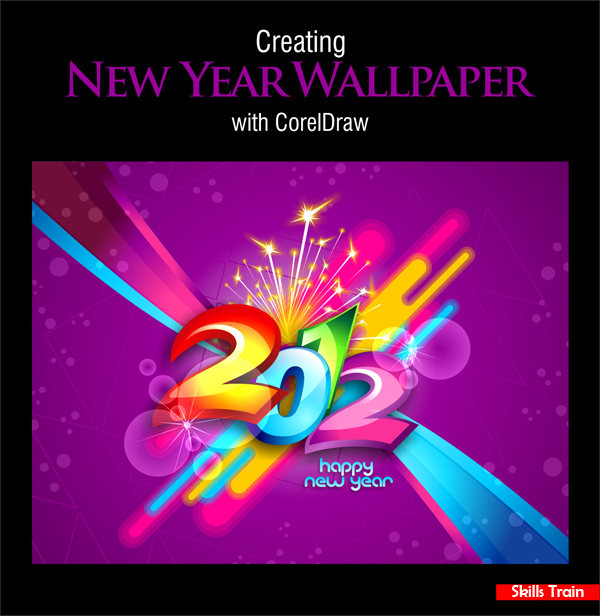
Step 1 : Basic Elements
First of all you have to use CorelDraw with version 11+. In this tutorial I use CorelDraw X5, Okay lets get started. Let’s take a look at the basic elements used to create our design :

This also will be our steps to create the design.
Step 2 : Creating Worksheet
Okay, now that you know the steps and elements, we will begin, first of all open your CorelDraw program, now create a new file and set the paper size to A4 and the units to pixels.

Step 3 : Working with Bezier & Shape Tool
Now that we have our worksheet set, we will begin to create the custom Font, go to the " Bezier Tool " in the left toolbar ,point and click to create a custom shape similar like below.

After that go to the " Shape Tool ", right click on the upper middle lines and go to the upper toolbar, there you will find " Convert to curves " tool click in order to shape.

Now in the corner you will see an arrow, drag the arrow to shape, make sure you shape it like a " 2 " shape.

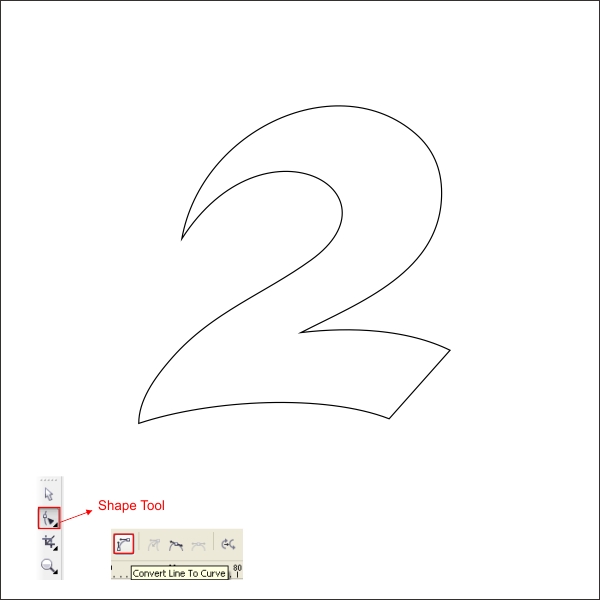
Using same steps as above, create another number which is " 0 " and " 1 ".

After you create all the numbers, arrange it randomly similar like below.

Step 4 : Texture & Color
Now that we have all the numbers, select the first number which is " 2 " and put color in it, go to the " Fountain Fill Tool " in the left toolbar and apply the value below.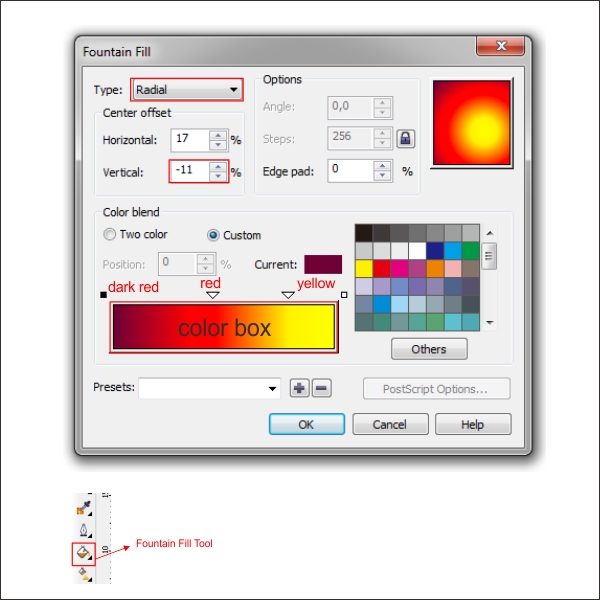
Tips : You can create a custom color by double click on the color box.

Okay now we are going to add an outline to the number, go to the " Contour Tool " in the left toolbar, after that go to the upper toolbar, there you will see the contour option bar, apply the value below.

After that separate the outline by pressing " Ctrl + K ", select the outline and put color in it by go to the " Fountain Fill tool " and apply the value below.


Now we are going to make a texture for the font, create a custom shape on top of the number " 2 " using " Bezier & Shape Tool " similar like below, put a pale yellow in it.

Go to the " Transparency Tool " in the left toolbar and in the upper toolbar you will find the transparency option bar, apply the value below to create similar transparency.

After that we are going to insert the transparent texture inside the " 2 ", go to the upper toolbar and find " Effect > PowerClip > Place inside container ", now your cursor will change into an arrow, click it to the "2".


Now select the "0" shape and put color in it by go to the " Fountain Fill tool " and apply the value below.


Okay now we are going to add an outline to the number, go to the " Contour Tool " in the left toolbar, after that go to the upper toolbar, there you will see the contour option bar, apply the value below.

After that separate the outline by pressing " Ctrl + K ", select the outline and put color in it by go to the " Fountain Fill tool " and apply the value below.


Now copy and resize the "0" shape, make sure the copied shape is smaller than the original.

Go to the " Transparency Tool " and drag the glass cursor from top right corner to the middle to make it linear transparent.

Okay now that you got the idea, using same steps as above apply it to all the numbers, put any color that you like.

Step 5 : Creating The Elements
Now that we have our Font ready, lets begin to create the Elements, go to the " Bezier Tool " and create a yellow custom shape similar like below.
After that make the corner of the shape to rounded using " Shape Tool ".

Lets make an outline for the custom shape, go to the " Contour Tool " and apply the value below.

Break the outline by pressing " Ctrl + K ", put yellow color on the outline and make it transparent by go to the " Transparency Tool " and apply the value below.

After that group the shape by selecting all of them and press " Ctrl + G ", now copy it as much as you like and make sure you put different color on the copied shape to make it vibrant.

Now group all of them by pressing " Ctrl + G " and rotate it by double click and rotate it.
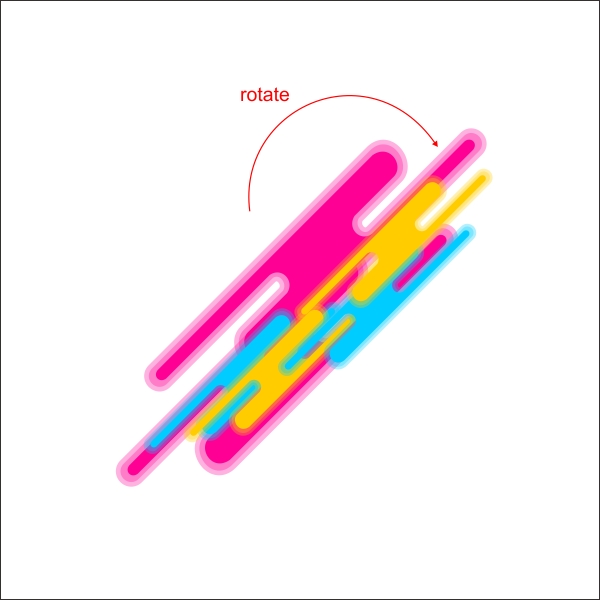
Create three custom curvy shape similar like below using " Bezier & Shape tool ", on top of the previous shape.

Put pink gradient color on the first and second shape by go to the " Fountain Fill tool " and apply the value below.


Now select the last curvy shape and put Blue gradient color in it by go to the " Fountain Fill tool " and apply the value below.


After that flip and copy the curvy shape by pressing " Left + Right " mouse while dragging it to the opposite direction.

Now i need you to select the "2012" font that you previously create and arrange it on top of the elements by pressing " Shift + PageUp " to make it top layer.

Step 6 : Creating The Firework
Now lets create the Firework, go to the " Bezier Tool " in the left toolbar and create a custom spark shape similar like below.
Put a gradient yellow in it using " Fountain Fill Tool " and apply the value below.


Now i will make the background to be black so we can see it clearly, copy and resize the smaller sparks.
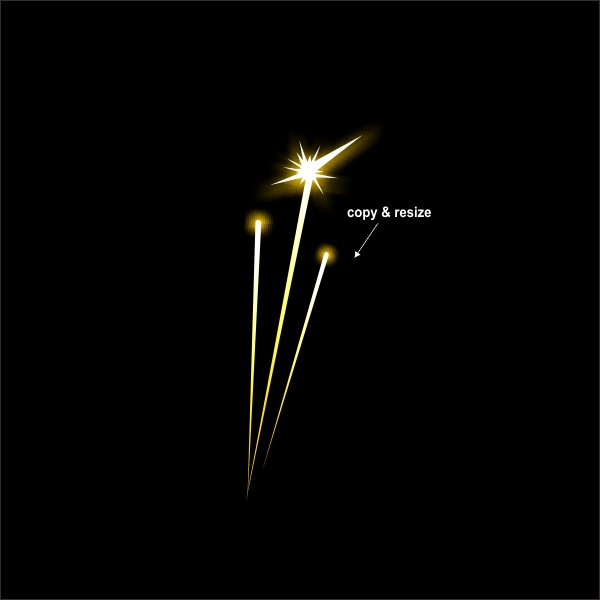
After that copy and resize it again as many as you like untill it looks like a firework sparks.


Group all the sparks by pressing " Ctrl + G ", and arrange it on top of the fonts and elements we previously create.

Step 7 : Creating The Frame
Okay now lets Create the Frame, first go to the " Rectangle Tool " and create a box shape with the size of 1024 x768 px..
Put a Purple gradient color in it by go to the " Fountain Fill tool " and apply the value below.


Now put the font and element on top of the frame, and place it inside the frame using " PowerClip ".

Lets make it more detail by adding a shadow sphere, go to the " Ellipse Tool " in the left toolbar and create a circle shape.

I will make the background to black so we can see it clearly, go to the " Transparency Tool " and create a radial type transparency on the circle shape.

Copy and resize the circle similar like below.

After that go to the " Polygon Tool " and create a 6 corner of polygon shape.

Go to the " Distort Tool " and after your cursor are changing, drag it to the outside direction of the shape to create similar object.

Arrange it on top of the circle shape to create a sparkle.

Group the sparkle by pressing " Ctrl + G " and put it anywhere on the frame.

Final Image
And we are done, by using the same technique as above you can add more details to the Wallpaper to make it more exciting like the final image below.


0 comments: