


Create a Polaroid Collage in CorelDraw
You just have to follow some simple steps and you are done. Here we start creating Polaroid Collage in CorelDrawFinal result:

Program: Corel Draw X4 (You can use other version also)
Difficulty Level: Medium
Completion Time: half an hour
Basic Elements:
Take a look at the basic elements you need to design the collage:

Step 1:
First of all open your CorelDraw program. Create a new file. Set the paper size to A4 and change it to landscape view.

Now we have to create our first basic element that is Polaroid boxes. For this go to your rectangular tool and create a rectangle of any size you want. Here I am using the following size.

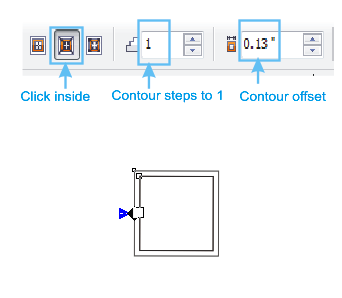
Click on the rectangle and go to interactive contour tool. In property bar, click inside because we want to go inside. Set the contour steps to 1. And if you want then you can change the contour offset.
Now you have to do wider the contour box from below for that you have to break the contour group apart as both the boxes are grouped together. First select the contour box using pick tool and then press Ctrl + K on keyboard. You can also go to arrange on menu bar click break contour group apart. Now click on the inner contour box and make it shorter from below like this:

Color the outer box white. You can do it by clicking white color in the color box. Color the inner box with any different color. Here I am using 50% black. Group both the boxes for that press Ctrl+G or go to arrange and click group. It’ll look like this:

Like this Polaroid you have to make
multiple polaroids for that select the Polaroid box using pick tool and
press + on the keyboard to duplicate polaroids. Here I have duplicated
it 10 times. Situate the polaroids as u want. If you want to rotate them
then click on the Polaroids 2 times. And you’ll see arrows around
Polaroid box you can click on them and rotate it. After situating the
polaroids, to make it more attractive you can reorder the polaroids eg.
If you want one of the Polaroid to move front, you just have to click on
the Polaroid you want front and press shift + page up. You can do the
same thing for page down. Just press shift + page down. Or else go to
Arrange–>Order–> To Front Of Page or To Back Of Page.
Situate them as you want. I have situated them like below:

Yeah guys, we have created our first
basic element. And you don’t have to create the second element because
it’s just a photo. Now we’ll create the background. For that make a box
using rectangle tool. We’ll put a texture in it. Go to Fill in the tool
box and choose Texture Fill. Choose whatever texture you want or see
below to make the texture like mine.

Step 8:
Now color the inner boxes of all
Polaroids with background color by using Smart Fill tool (It is situated
in the tool box). After doing this, select all the inner boxes which
you’ve colored now. To select all the objects once, press Shift and keep
clicking on the objects. To see how many objects you have selected look
at the bottom bar. Combine them by pressing Ctrl + L on the keyboard or
click on the upper combine button in the property bar.

Step 9:
Put the photo on the boxes in which
position you want. Select the photo and go to the Effects–>
Powerclip–>Place inside Container. An arrow will come click that
arrow on the inner boxes. You will see the photo in the Polaroid boxes.
We did this thing because we wanted to situate the photo into the boxes.
If you want to edit the position of the photo then you can do this by
going on Effects–>Powerclip–>Edit contents. Once you have
finished, click on Finish Editing Objects.

We have not done yet. We have to apply
some effects. If you look at the final result, you’ll notice drop shadow
behind the boxes. Now select one of the polaroid box and go to the
Interactive Drop Shadow tool in the tool box. Click on the Polaroid box
and drag. Drag it in whatever position you want. You can convert it by
changing the values in the property bar.

You have done the drop shadow on one
box. We can do it on all boxes just by copying the effect. Click on the
second box and go to Effects–>Copy Effects–>Drop Shadow From. An
arrow will come. Click that arrow on the first drop shadow (Don’t click
it on the Polaroid box). And you will see the same drop shadow effect on
the second box. Repeat the same step for all the Polaroid boxes. And
finally you will get this image:

Now we’ll add some effect to the background as you can see it in the final result. These boarders are nothing but rectangles. Yeah really, first make a rectangle fill the black color in it and click on the cross for no outline like below:


Now for the opposite side, click on the right side rectangle and press + to duplicate it. To make it in opposite direction click Mirror horizontally in the Property Bar. And situate it on the opposite side.


And after doing everything you’ll get the final image like this:


0 comments: