This tutorial will show you how to create 3D buttons in Corel DRAW!
Open a new graphic. Choose the ellipse tool and, while holding down the
Ctrl key to constrain the ratio, draw a circle about 2.5 inches in
diameter at the left of the page.
Select the pick tool and, with the circle selected, hit Ctrl-c and
Ctrl-v to copy and paste the circle. Use the right cursor key to move
the copy to the right of the page.
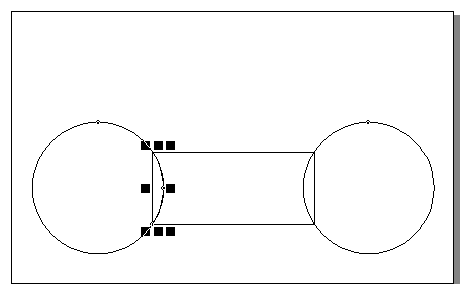
Select the rectangle tool and draw a rectangle between the two circles.
Make sure that the corners of the rectangle meet with the circles
Use the pick tool to draw a marquee around both circles and the rectangle. Click the intersection  icon. This will only create the intersection of the left-most circle and the rectangle
Use the pick tool to draw another marquee around the right-most circle
and the rectangle. Click the intersect icon again. You should now have
two intersections with the rectangle. Choose the circles, one at a time,
and delete them. This should leave you with something like figure
Use the pick tool to select the left-most curve and fill this object
with a light gray. Select the right-most curve and fill this object with
a dark gray
Select the fill tool and choose the gradient tool from the flyout menu.
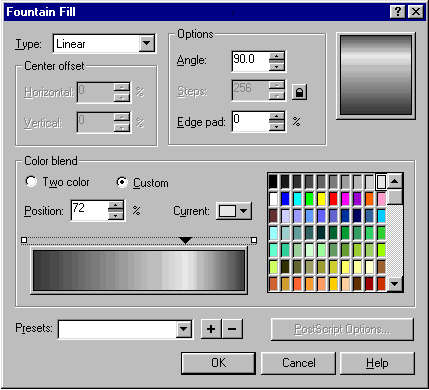
This will bring up the Fountain Fill dialog box. Under Color blend,
select Custom. This will change the Fountain Fill dialog box so that it
resembles figure
Add another point to the blend by double-clicking above the rectangular
blend window. Change the middle point (the one you just added) to a
light gray by clicking on the Current pulldown menu (it's just above the
custom blend window). Change the color at both of the outside points to
dark gray. Set the Angle to 90 and adjust the middle point so that your
blend resembles the one in figure. Click OK.
NOTE: The custom blend
starts out with only a beginning and an ending point. You can add more
points to create your custom blend by double-clicking above the blend
window. These points can also be moved by clicking and dragging.
Select the button with the pick tool and, using the outline tool flyout menu, set the outline to none.
Use Arrange, Transform, Scale and Mirror to resize the button.
At this point you might want to save the button.
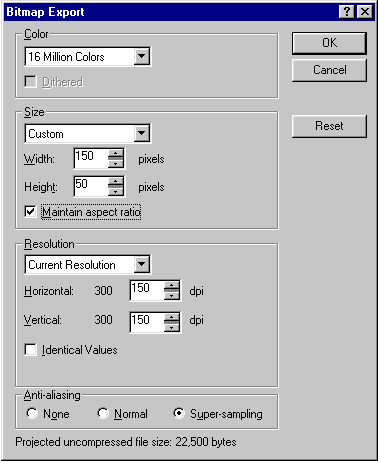
I exported the button as a JPG with the following settings in the Bitmap
Export dialog box. The really important settings to remember are the
Maintain aspect ratio and Super-sampling.
Use the text tool to add some text to your button. I used the Bedrock
font. You may choose to copy and paste the text with a different color
to add a highlight.
Export the final button as a web-ready JPG and make sure you keep a copy
of the vector drawing i.e. save the image as a CDR file so you can go
back and make changes easily later on.
That's it...
10:34 PM
Posted by
Aamir Awan
This tutorial will demonstrate how you can create a page curl effect.
Many people have written asking how this is done and I'll be
demonstrating the technique with all of the programs I write tutorials
for. I used Corel DRAW! 7.0 for Windows for this technique. Some things
may be done differently with other versions.
Sometimes it's harder to see how a certain effect can be created in a
drawing (vector or object oriented) program versus a paint program. It
may not be immediately obvious how to create the effect using a
collection of objects rather than just being able to paint the pixels
in. I think this may be the case with an effect like a page curl. For
this tutorial I'll create a yellow sticky note and curl one corner of it
up.
Begin by drawing a rectangle. Once you've drawn the rectangular shape, fill it with a bright yellow
Draw another rectangle that's long and narrow. Place this rectangle
along the bottom of the first and turn it so that it covers the two
corners of the yellow rectangle and so that it's on an angle as in
figure .
Use the Pick tool to draw a marquee around both of the shapes.
Along the toolbar (the second line below the menu choices) you should
see the trim icon (see figure). Click this icon to trim the top
rectangle (the last rectangle shape you created) from the bottom
rectangle (the yellow one that you created first).
Click away from the two shapes to deselect them. Select the long
rectangle and press the delete key to discard it. You should now have
just the bottom portion of the sticky note (a rectangle shape with an
angled bottom).
Double click the Polygon tool and, in the Options dialog box, choose the
Toolbox tab. Under Polygon Tool Defaults set the Polygon option and set
the number of Points/Sides to 3. This will enable you to draw a
triangle.
Draw a long narrow triangle shape beside the yellow rectangle
Choose Layout, Snap to Objects.
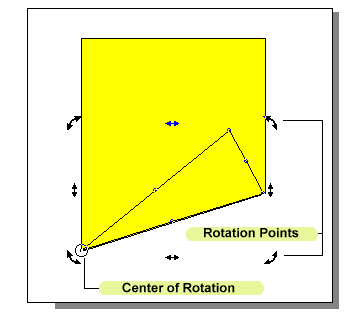
Select the Pick tool and click twice on the triangle to set the rotation
points (see figure). Move the center of rotation point (see figure) to the top point of the triangle. Click the triangle again to set
the sizing points. Move the triangle so that the top point is aligned
with the bottom-left corner of the sticky note. Click the triangle again
to change to the rotation points. Click on one of the corner rotation
points and drag the triangle until it aligns with the bottom of the
sticky note
With the triangle still selected, choose Arrange, Convert to Curves.
Select the Shape tool. Select the node in the middle of the right side of the triangle and press the delete key to discard it.
With the Shape tool, marquee select the two right corners of the triangle and click on the To Curve icon on the toolbar.
Place the cursor in the middle of the line along the right side of the
triangle and drag it to the left until you get a nice rounded curve
If you need to, you can stretch the triangle shape so that it fits along
the bottom of the rectangle. Just select the Pick tool and click on the
triangle, then stretch it to fit. With the "Snap to Objects" still on
this should be relatively easy.
Now you should have both shapes of the sticky note. The yellow note, itself, and the triangle that'll become the page curl.
All that's left to do is use a fountain fill to blend some shadows and
highlights onto the triangle to give the appearance of a 3-dimensional
curve.
Use the Pick tool to select the triangle shape.
Click-and-hold the Fill tool icon. This will bring out the Fill tool flyout. Select the Fountain Fill Dialog icon.
In the Fountain Fill dialog set the Type to Linear and click the Custom button.
You're going to have to play around with the Angle, the Edge Pad and the
placement of the colors to come up with a fill that fits your
particular triangle.
To start, set the left-most color to a bright yellow. Click on the
Current option and then select Others. Set the color to a darker yellow.
I chose 0, 0, 75, 24.
Click along the top of the gradient about a quarter of the way out from
the left end and click the bright yellow color square in the colors
swatch. Click a little ways over to the right and choose white. Click a
little over again and select the bright yellow again. Finally, set the
color at the far right to a dark yellow.
Set the Angle to about -45% and the Edge Pad to 20.
You should have similar settings to those shown in above figure
Click OK.
You may find, like I did, that the fill doesn't give you the effect you
expected. If this is the case, bring up the Fountain Fill dialog box
again. If the white line wasn't visible move the two yellows and the
white over and click OK.
Once the white and yellow lines are visible you can adjust the angle, as well.
You may find that you'll need to add another color such as another dark
yellow close to the left edge of the bright yellow/white lines.
It should only take a couple of minutes of fine tuning to get the effect just right.
Marquee select both shapes and select the Outline tool. Hold down the
mouse button until the flyout appears. Select the No Outline option.
You'll now have a yellow sticky note with a curled-up corner
Now, because this is a vector image, you can easily resize it, and add some text whatever you want.
10:17 PM
Posted by
Aamir Awan
In this Article, we are going to create Windows Start orb in corel draw. Let’s have a look.
Step #1
To create windows start orb, first select Ellipse Tool (F5) and draw
circle then add color to it. After that select fountain fill (F11),
choose dark color and middle color lighter, choose type radial from drop
down menu. Do the same setting as from the image below.
Step #2
Now to add glassy effect, Select the Bezier tool and make triangle
then select shape tool. Create curves both sides as on the screenshot
below:
Now do the same with the bottom line
Step #3
Select pick tool, click on the layer and select Transparency Tool. You can see the glassy effect
Step #4
Now again select Ellipse Tool (F5). Make small circle and give light cyan color. After that, select transparency tool.
In step 3, we added transparency from up to down, this time we will add from down to up.
Step #5
Its time to create Windows design. Select Rectangle Tool (F6). Create
small rectangle, select shape tool and shape it accordingly.
Do same with bottom line, then copy and paste the object. Move down and
select both two layers, again copy and paste. Then click mirror
horizontally and mirror vertically.
Step #6
Now color all the boxes. Upper left one with dark red, upper right
with dark green, down left with dark blue, down right with dark yellow
and remove outline.
And Finally, we have designed Windows Start Orb in Corel Draw.
Hope, you enjoy this Thanks!
How can you help us to spread this site?
10:10 AM
Posted by
Aamir Awan