Creating 3D Buttons with Corel DRAW!
This tutorial will show you how to create 3D buttons in Corel DRAW!Open a new graphic. Choose the ellipse tool and, while holding down the Ctrl key to constrain the ratio, draw a circle about 2.5 inches in diameter at the left of the page.
Select the pick tool and, with the circle selected, hit Ctrl-c and Ctrl-v to copy and paste the circle. Use the right cursor key to move the copy to the right of the page.
Select the rectangle tool and draw a rectangle between the two circles. Make sure that the corners of the rectangle meet with the circles
Use the pick tool to draw a marquee around both circles and the rectangle. Click the intersection
Use the pick tool to draw another marquee around the right-most circle and the rectangle. Click the intersect icon again. You should now have two intersections with the rectangle. Choose the circles, one at a time, and delete them. This should leave you with something like figure
Use the pick tool to select the left-most curve and fill this object with a light gray. Select the right-most curve and fill this object with a dark gray
Select the fill tool and choose the gradient tool from the flyout menu. This will bring up the Fountain Fill dialog box. Under Color blend, select Custom. This will change the Fountain Fill dialog box so that it resembles figure
Add another point to the blend by double-clicking above the rectangular blend window. Change the middle point (the one you just added) to a light gray by clicking on the Current pulldown menu (it's just above the custom blend window). Change the color at both of the outside points to dark gray. Set the Angle to 90 and adjust the middle point so that your blend resembles the one in figure. Click OK.
NOTE: The custom blend
starts out with only a beginning and an ending point. You can add more
points to create your custom blend by double-clicking above the blend
window. These points can also be moved by clicking and dragging.
Select the button with the pick tool and, using the outline tool flyout menu, set the outline to none.
Use Arrange, Transform, Scale and Mirror to resize the button.
At this point you might want to save the button.
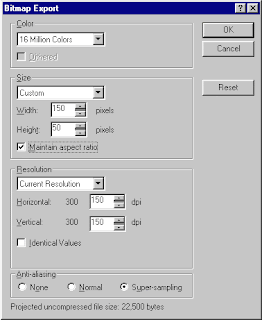
I exported the button as a JPG with the following settings in the Bitmap Export dialog box. The really important settings to remember are the Maintain aspect ratio and Super-sampling.
Use the text tool to add some text to your button. I used the Bedrock font. You may choose to copy and paste the text with a different color to add a highlight.
Export the final button as a web-ready JPG and make sure you keep a copy of the vector drawing i.e. save the image as a CDR file so you can go back and make changes easily later on.
That's it...


0 comments: